Creating an Audio Capture question
An Audio Capture question allows candidates to record a verbal response to a prompt. In HTML tests, candidates can record up to 60 minutes of audio.
This article explains how to create a basic Audio Capture question in Surpass and includes information on how to limit candidates’ attempts and use the Item, Record, Saving, and Visual options.
In This Article
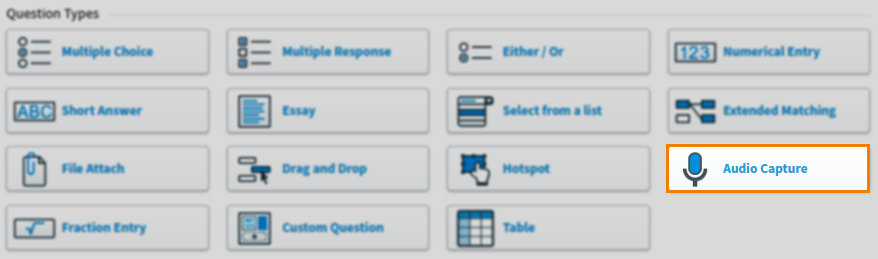
1. Choose your item type
In a Mixed subject, select Create New Item to open the Question Types menu. Choose Audio Capture to create a blank Audio Capture item and go to the Edit screen.
2. Name your item
Enter the item’s name in the Name field.

3. Enter your question text
Enter your question text in the question stem. Select Add Text Area to add an additional question stem. You can have a maximum of five question stems per item.

Open Additional Options to add source material or assistive media to your question stem. In mixed subjects, you can also add a table to your question stem (in HTML subjects, tables can be added using the formatting toolbar).
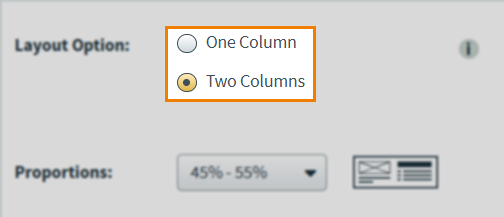
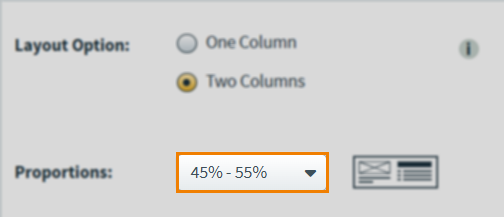
Two-column item layout
A two-column layout displays Supporting Content alongside the Question Content allowing the candidate to see all information provided without the need for scrolling.
Open the Item Settings panel.

Select Two Columns from the Layout Option.
You can change the columns’ Proportions using the drop-down menu.
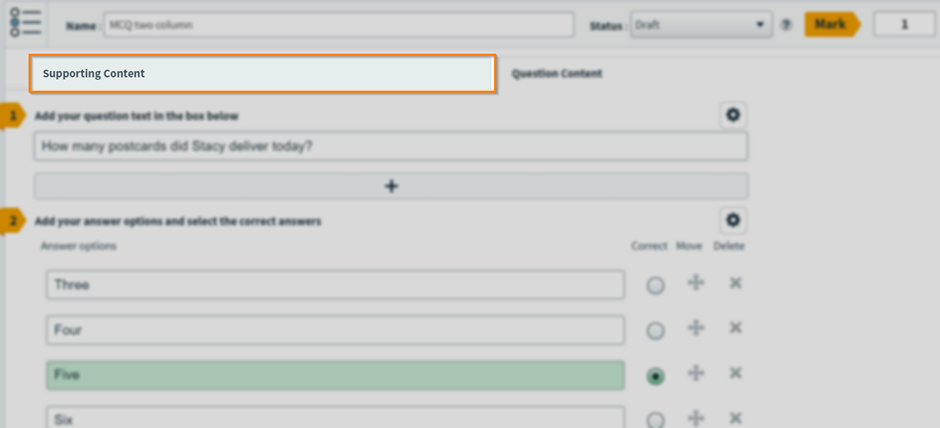
Select the Supporting Content tab to edit the second column. You can add up to 5 different supporting content stems, with a maximum of 1 piece of assistive media per stem.
4. Set the recording time
Set the maximum recording time (in minutes and seconds) in the entry field. The maximum available recording time is 60 minutes (60:00).

Limiting candidates’ attempts
You can restrict how many times candidates can attempt their recorded response.

Select Limit candidate attempts and enter a numerical value in No. of attempts.
Using Item Options
Use the Item Options settings in Additional Options to allow candidates to playback their responses and configure audio cues (or “beeps”) on recording start and end.
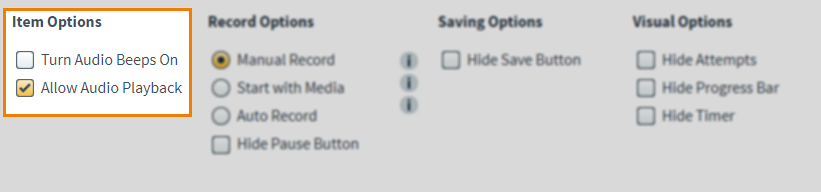
Open Additional Options to view Item Options. The following table details the available settings.
| Setting | Description |
|---|---|
| Turn Audio Beeps On | Plays short audio signals at the beginning and ending of candidates’ recordings. One short beep plays when the recording starts. A longer beep plays when candidates select Save or if the recording time expires. |
| Allow Audio Playback | Allows candidates to replay their recorded responses. |
Using Record Options
Use the Record Options settings in Additional Options to set how the recording starts. You can allow candidates to start the recording themselves or set up recording to automatically begin when the item is loaded.

Open Additional Options to view Record Options. The following table details the available settings.
| Setting | Description |
|---|---|
| Manual Record | Candidates can select Record to start their recording. |
| Auto Record | Recordings automatically start as soon as the item is loaded.
NOTE: A visual indicator that recording is in progress appears if you use Auto Record to hide the Record button.
|
| Hide Pause | Candidates are unable to pause their recording once started.
NOTE: Hide Pause is only available with the Manual Record option.
|
Using Saving Options
Use the Saving Options setting in Additional Options to determine whether candidates have access to the Save button in delivery.

Open Additional Options to view Saving Options.
Select Hide Save Button if you do not want to show the Save button to candidates in delivery. With Hide Save Button enabled, responses are saved either when the recording time expires or candidates move to the next item.
Using Visual Options
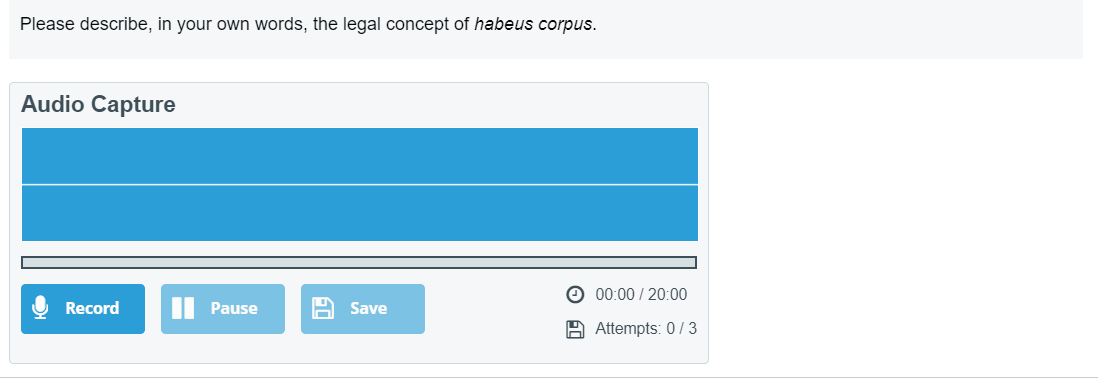
By default, candidates are able to see the following information on an Audio Capture item in delivery:
- The number of times they have attempted the response.
- How much recording time they have left on the progress bar.
- How long they have been recording and their maximum allowed time on the timer.
- A waveform to indicate microphone input.
You can turn off any or all of these features in Additional Options > Visual Options.
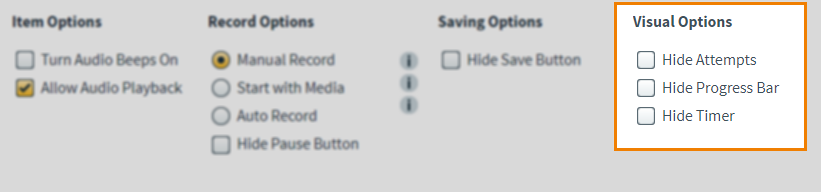
Open Additional Options to view Visual Options. The following table details the available settings.
| Setting | Description |
|---|---|
| Hide Attempts | Prevents candidates from seeing how many attempts they have had. |
| Hide Progress Bar | Hides the recording progress bar from candidates during recording. |
| Hide Timer | Hides the recording timer from candidates. |
5. Set the question’s marks
Set the item’s total marks in the Mark field.

6. Select a workflow status
Set the item’s workflow status in the Status drop-down menu. Only items set to Live can be used in a test.

7. Preview your question
To see your item from a candidate’s perspective, select Preview .

If you need to continue working on the item, select Edit to return to the Edit screen.

8. Saving and closing your item
Select Save to save your item to your subject.

To see additional saving options, use the Save arrow to open the Save Options menu. Select Save & Close to save the item and return to the Subjects screen. Select Save & New to save the item and create another Audio Capture item.

Select Close to leave the Edit screen. If you have unsaved changes, you are prompted to either save or discard them.

Further reading
You can do much more with Audio Capture items in Surpass. For more information, read the following articles: