Setting up a test for paper marking
In Surpass, you can control whether a test is marked on-screen or on paper. You can set up a test for paper marking in Test Creation.
This article explains how to set up a test for paper marking. For more information about the Paper Mark screen in Test Administration, read About the Paper Mark screen.
In this article
1. Create a test
To set up a new test for paper marking, go to Test Creation > Tests. For more information about the Tests screen, read About the Tests screen.

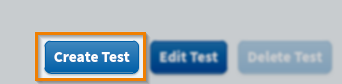
2. Select Create Test
Select Create Test on the Tests screen.
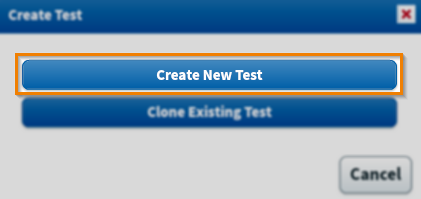
In the Create Test dialog, select Create New Test.
3. Enter test information
Fill out the fields in the Create Test dialog to create a new blank test.
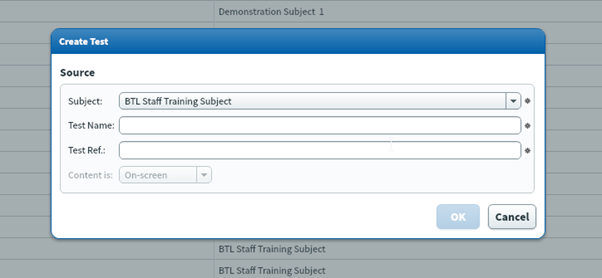
Fill out your new test’s information in the Create Test dialog. Refer to the following table for information on each field.
| Setting | Description |
|---|---|
| Subject | Choose the subject that contains the items you want to include in your test. |
| Test Name | Enter a name for your test. This is visible to Surpass users and candidates. |
| Test Ref | Enter an alphanumeric reference. The reference is visible to Surpass users, but not candidates. The reference must be unique. |
| Content is |
Choose the test delivery type. If your test is delivered on a computer, select On-screen. If your test is delivered on paper, select Paper-based.
NOTE: Paper based tests are a legacy setting and only applicable to ContentProducer content. For most users, this option is greyed out. Only certain item types are compatible with paper tests. For more information, read Printing test forms in Test Creation.
|
4. Configure test for paper marking
Select the Advanced Settings tab in the Edit Test dialog. For more information about test settings, read About test settings.

To set up a test for paper marking, open the Marking Type menu and select Paper Marking.

When you have created your test and set it up for paper marking, you can create test forms suitable for paper delivery in the Test Forms screen. For full instructions, read the Creating test forms and About test form settings articles.
For more information about marking paper tests, see Marking a paper test in the Paper Mark screen.
Further reading
Now you know how to set up a test for paper marking, read the following articles to learn more: