Creating accessible content with the formatting toolbar
The formatting toolbar lets you control the appearance of selected text when creating items or source material. The formatting toolbar allows you to change the content type on certain entry fields from text to equation, image, or table. You can use the formatting toolbar to create accessible content for candidates with accessibility requirements.
This article explains how to create accessible content with the formatting toolbar.
Table of Contents
Finding the formatting toolbar
The formatting toolbar is available in the following locations:
- Item question stems
- Answer options for the following question types:
- Multiple Choice
- Multiple Response
- Either/Or
- Advanced Short Answer (HTML subjects only)
- Advanced Numerical Entry (HTML subjects only)
- Introduction Page, Information Page, and Finish Page text fields
- HTML source material text fields
To reveal the formatting toolbar, select the text field. For more information, read Using the formatting toolbar.
- Align text along the left margin
- Keep the size of your text at 16
- Use simple and clear fonts like Arial
- Use italics as little as possible in large bodies of text
- Keep line spacing to 1.5
- Keep line width around 60 or 70 characters
- Avoid writing text in block capitals
Changing text colour
To change the colour of text using the formatting toolbar, select Text Colour ![]() and choose from the options available.
and choose from the options available.
- Colours must have sufficient contrast, for example, between the text colour and the background colour, including text on images, icons, and buttons
- Colours used to convey information on diagrams, maps, and other types of images must be distinguishable
Using special characters
Special characters are non-standard letters (Ω), symbols (©), and punctuation marks (¡) that cannot be found on a typical keyboard. You can add special characters to content using the formatting toolbar. Special characters added to content using the formatting toolbar can be pronounced correctly by a screen reader.
Select Insert Special Character Ω on the formatting toolbar to open the Select Special Character dialog.
Choose a character from Select Special Character to add it to your content. Special characters are added at the cursor’s location. For more information, read About special characters.
- Only use special characters for typographical symbols and characters that are not available on a keyboard
- Do not use special characters to create equations
Using equations and mathematical symbols
You can add equations and mathematical symbols to content using the formatting toolbar.
To create and edit equations, select Equation Editor ![]() (Mixed subjects) or WIRIS EDITOR math
(Mixed subjects) or WIRIS EDITOR math ![]() (HTML subjects). For more information, read ‘Creating equations’ in Using the formatting toolbar.
(HTML subjects). For more information, read ‘Creating equations’ in Using the formatting toolbar.
- Always use the WIRIS EDITOR math
 to create mathematical characters and equations. Keyboard characters might not produce correctly formatted characters and might not be interpreted correctly by screen readers
 - Do not separate characters with spaces. Screen readers might read the spaces making it harder to understand the expression
Using tables
There are two types of table: layout and data. Layout tables are used to present information such as text or an image. Data tables are used to display tabular data and include row and column headers. Screen readers can interpret data tables with row and column headers, allowing candidates to easily understand table contents.
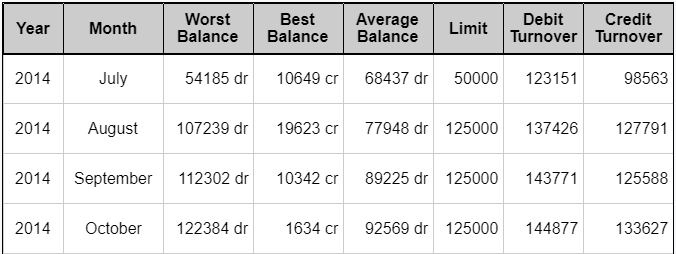
To create and edit tables, select Table Editor ![]() . For more information, read ‘Creating tables’ in Using the formatting toolbar. See an example of a data table below.
. For more information, read ‘Creating tables’ in Using the formatting toolbar. See an example of a data table below.

- Do not add captions or HTML markup to layout tables
- Use simple tables where possible
- All data tables must have a row and/or column that is used as a header
- Add a caption to data tables that screen readers can interpret
