About test settings
When creating or editing a test in Surpass, you can configure its settings in the Edit Test window.
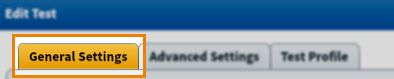
The Edit Test window is divided into three tabs:
- General Settings covers fundamental test settings like name and reference, test type, and delivery method.
- Advanced Settings covers additional options that control how test forms are distributed to candidates, how test form navigation works, and how results are displayed in the system.
- Test Profile allows you to apply a custom style profile to your test. This includes unique logos and colour schemes as well as intricate control over UI elements for HTML tests.
This article explains each option in both General Settings and Advanced Settings tabs of the Edit Test window, including how to set your test availability and add additional test time. For more information about test profiles, read About test profiles.
In this article
General Settings
The General Settings tab is divided into four sections: Test Details, Test Delivery Options, Test Availability, and Candidate Score Boundaries.
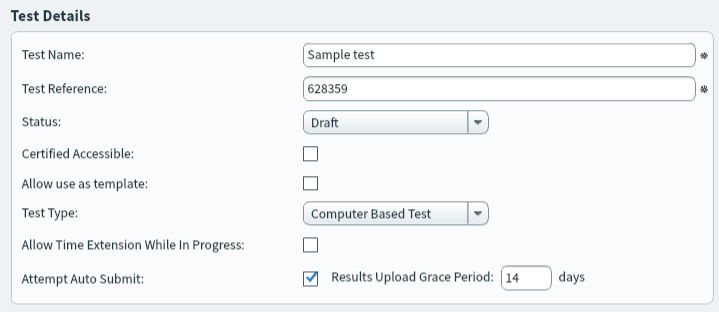
Test Details
| Setting | Description |
|---|---|
| Test Name* |
The name of the test. This is visible to candidates. |
| Test Reference* |
The test’s alphanumeric reference code. The reference must be unique. This is not visible to candidates. |
| Status* |
Determines whether the test is available for scheduling. Choose from the following statuses:
IMPORTANT: Live tests can only be scheduled if they have at least one valid test form.
|
| Certified Accessible |
This setting is a flag to indicate you or your team have taken into consideration accessibility requirements and that your test is therefore accessible, according to whichever standard you adhere to.
NOTE: Selecting this option does not automatically make your test accessible. It is your responsibility to create accessible content.
|
| Allow use as template |
Allows the test to be cloned. For more information, read Cloning tests. |
| Test Type* |
Determines the type of test candidates will take. There are two types of test in Surpass:
NOTE: You must make computer based projects in Test Creation. You cannot retrospectively change a computer based test made in Test Wizard into a computer based project.
|
| Allow Time Extension While In Progress |
Allows invigilators to add up to 24 hours to the duration of In Progress tests.
NOTE: The candidate must close and re-enter their test for the time extension to take effect.
|
| Attempt Auto Submit |
Allows candidates taking tests in SecureClient to upload their responses at a later date if their internet connection is lost during the test. Candidates must re-open SecureClient with an active internet connection to automatically submit their responses. If Attempt Auto Submit is cleared, Surpass automatically voids tests not submitted in time.
IMPORTANT: For Attempt Auto Submit to work, you must also set up Results Upload Grace Period.
|
| Results Upload Grace Period |
Sets the amount of days that Surpass waits before automatically voiding tests that have not been submitted.
IMPORTANT: Results Upload Grace Period only works if Attempt Auto Submit is selected.
|
Test Delivery Options
| Setting | Description |
|---|---|
|
Candidates Receive (Before and including Surpass release 12:26: Delivery Options) |
Determines how the test will be delivered to candidates. SecureAssess is selected automatically. Candidates must enter their keycodes to access the test, which is delivered through a secure internet connection.
NOTE: This setting is obsolete and will be removed in a future release of Surpass.
|
| Requires SecureClient |
Restricts test delivery to SecureClient. This means that the test cannot be delivered using web delivery.
NOTE: This setting is not available for computer based projects.
|
| SecureClient Mode |
Sets the SecureClient delivery mode. Choose from the following two options:
|
| Requires BYOD Mode |
IMPORTANT: If you are interested in using the BYOD SecureClient, speak with your Surpass Account Manager.
Determines whether the Bring Your Own Device (BYOD) version of SecureClient will be used for the test. For more information on BYOD SecureClient, read ‘Delivering tests using BYOD SecureClient’ in About Surpass test delivery options. You must have Requires SecureClient enabled and the SecureClient Mode set to Locked. If Requires BYOD Mode is enabled, candidates must sit the test in BYOD SecureClient. Requires BYOD Mode automatically enables candidate logging. |
| Deliver in HTML Delivery |
Determines whether the test will be run on the standard (HTML) or legacy (Flash) test driver. This cannot be changed for a test that is already scheduled, regardless of its Pre-session Download Window (previously Advance content download timespan) value. To deliver a test using the standard (HTML) test driver, select Deliver in HTML Delivery. To deliver a test using the legacy (Flash) test driver, clear Deliver in HTML Delivery.
WARNING: Not all items can be delivered in the standard test driver. Check that your items are HTML-compatible before creating a test.
|
| Requires Invigilation |
Creates a second security wall after the keycode screen to prevent candidates from gaining early entry to tests. Tests can either be locked by a PIN or require manual unlocking by invigilators. For more information, read About the Invigilate screen.
NOTE: If you are delivering tests using SecureClient for iPad/Mac, read the ‘Invigilation’ section of the SecureClient troubleshooting article for information on SecureClient for iPad/Mac’s invigilation limitations.
|
| Certified for Tablet Delivery |
Determines whether the test will be delivered in the Surpass (Legacy) tablet app.
WARNING: Not all items can be delivered on the Surpass (Legacy) tablet app. Check that your items are tablet compatible before creating a test. For more information, read Configuring a test for tablet delivery.
|
|
Limit Resits (Before and including Surpass release 12:26: Restrict Number of Resits) |
Determines whether candidates have a limited number of resits. If cleared, candidates have unlimited resits. |
| Number of Resits |
Sets the amount of times candidates can resit a test. You must have Limit Resits enabled to use this. If set to 0, candidates cannot resit a test after their first attempt. |
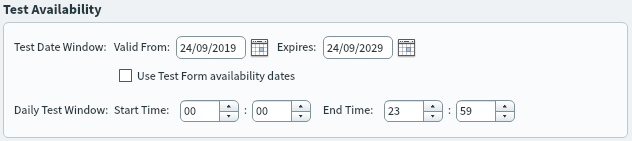
Test Availability
| Setting | Description |
|---|---|
| Test Date Window | Sets the date range in which the test can be scheduled for candidates. Use the Valid From and Expires date pickers to choose your start and end dates, respectively.Tests cannot be scheduled outside of the Test Date Window.
TIP: You can also enter your dates in DD/MM/YYYY format.
|
| Use Test Form availability dates | Gives each test form its own validity window. If cleared, all associated test forms share the test’s Test Date Window. This is useful if you have a test with multiple test forms, each of which are only valid for a short period of time (for example, a spring test form and an autumn test form). For more information on test availability see About test form settings. |
| Daily Test Window | Sets the period of time in which candidates can enter the test on any given day. Enter a Start Time and End Time in HH:MM format.
NOTE: Candidates still receive their full time on timed tests even if they enter the test near the end of the Daily Test Window.
|
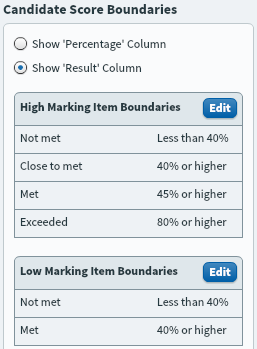
Candidate Score Boundary
If your test items have been set up with Learning Outcomes, you can define the score boundaries you want the candidate to meet for each Learning Outcome.
| Setting | Description |
|---|---|
|
Show ‘Percentage’ Column |
Displays a percentage breakdown of how candidates performed in each Learning Outcome. |
|
Show ‘Result’ Column |
Displays text against custom percentage boundaries for each learning outcome (for example, ‘Not Met’ for less than 40%, ‘Close to met’ for 41%-44%, ‘Met’ for 45%-79%, and ‘Exceeded’ for 80% or higher). There are two sets of boundaries. High Marking Item Boundaries are used for Learning Outcomes that have more than ten marks in the test and have four boundaries by default. Low Marking Item Boundaries are used for Learning Outcomes that have less than ten marks in the test and have two boundaries by default. Select Edit to change your candidate score boundaries. You can change the boundary text and percentage. Select Add to create a new boundary. You can have a maximum of ten boundaries. To remove a boundary, select Delete .
TIP: Low Marking Item Boundaries should have no more than two boundaries.
|
Advanced Settings

The Advanced Settings tab is divided into six sections: Advanced Test Delivery Options, Test Interface Options, P Value Ranges, Results Display Options, Miscellaneous Options, and User Associations.
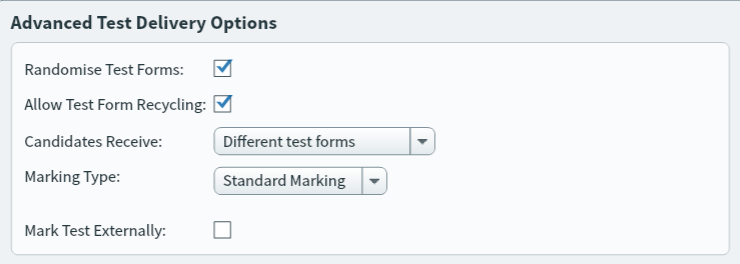
Advanced Test Delivery Options
| Setting | Description |
|---|---|
| Randomise Test Forms |
Distributes test forms in a random order to candidates if there is more than one form of the same test. |
| Allow Test Form Recycling |
Enables candidates to take the same test form if they resit a test. If cleared, candidates are unable to resit a test if they have already sat all available test forms. |
|
Candidates Receive (Before and including Surpass release 12:26: Delivery Options) |
Determines the test delivery options available to Test Administration users. Choose one of the following options:
|
| Test Distribution |
Determines whether the test is available for scheduling through Surpass, SurpassLocal, or both. Choose one of the following options:
|
| Marking Type |
Determines how the test will be marked in Test Administration. Choose one of the following options: You can select:
IMPORTANT: Psychometric marking is only available for ContentProducer items.
|
| Mark Test Externally |
Forces the test to bypass the Mark screen and go straight to Audit, allowing you to mark the test externally to Surpass.
NOTE: If you select Mark Test Externally, computer-marked items are marked automatically and human-marked items are awarded zero marks.
|
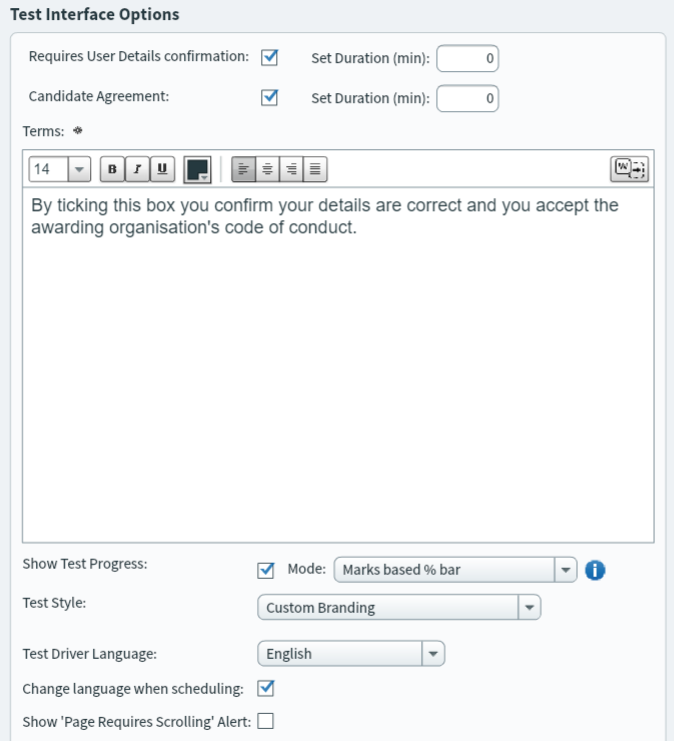
Test Interface Options
| Settings | Description |
|---|---|
|
Requires User Details confirmation |
Forces candidates to confirm their personal details before starting the test. You can set a time limit for candidates to confirm their details in Set duration (min). The accepted value range is 0–60. A Set duration (min) value of 0 gives candidates unlimited time to confirm their details. |
|
Candidate Agreement (Before and including Surpass release 12:26: Requires NDA confirmation) |
Forces candidates to agree to terms before starting the test. You can set a time limit for candidates to agree to the terms in Set duration (min). The accepted value range is 0–60. A Set duration (min) value of 0 gives candidates unlimited time to agree to the terms.
TIP: You can customise the terms in the Terms field.
|
|
Terms (Before and including Surpass release 12:26: Confirmation Text) |
Change the default text. You can use basic formatting tools or select Import formatted text from MS Word to copy text from Microsoft Word. |
| Show Test Progress |
Displays the progress bar to candidates. The progress bar shows candidates where they are in the test. The progress bar has three modes. Select the relevant option in the Mode menu.
NOTE: Item based fraction text is only available for HTML tests.
|
| Test Style |
Determine the test’s navigation style. Choose from the following two options:
IMPORTANT: Legacy Navigation (deprecated) and Forward only navigation (deprecated) are legacy settings and should not be used.
|
|
Test Driver Language (Before and including Surpass release 12:26: Default Navigation Language) |
Determines the language used for the test driver’s interface and menus. This does not affect item content. For a list of all available languages, read About Surpass test languages. |
|
Change Language When Scheduling (Before and including Surpass release 12:26: Allow Language Override) |
Allows Test Administration users to change the Test Driver Language setting at the point of scheduling. |
| Show ‘Page Requires Scrolling’ Alert |
Displays an alert to candidates when item content is larger than the window and requires a scroll. |
| Auto-Launch PDF viewer/HTML content |
Determines whether the PDF viewer / HTML content panel is opened automatically when candidates enter an item containing the relevant source material. If cleared, candidates must manually open source material. |
| Enable Search in PDF Viewer |
Allows text search functionality in the PDF viewer. |
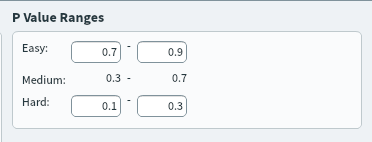
P Value Ranges
You can set up the P value ranges for three difficulty categories: Easy, Medium, and Hard. You can search for items in these ranges when creating a test form and define how many Easy, Medium, and Hard items you want in your test. For more information, read About test form search parameters and About test form content.
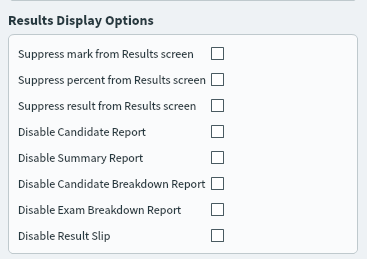
Results Display Options
| Setting | Description |
|---|---|
| Suppress mark from Results screen | Hides candidates’ marks on the Results screen. |
| Suppress percent from Results screen | Hides candidates’ percentage score on the Results screen. |
| Suppress result from Results screen | Hides candidates’ grade on the Results screen. |
| Disable Candidate Report | Hides the Candidate Report button on the Results screen. |
| Disable Summary Report | Hides the Summary Report button on the Results screen. |
| Disable Candidate Breakdown Report | Hides the Candidate Breakdown Report button on the Results screen. |
| Disable Exam Breakdown Report | Hides the Exam Breakdown Report button on the Results screen. |
| Disable Result Slip | Hides the Results Slip button on the Results screen. |
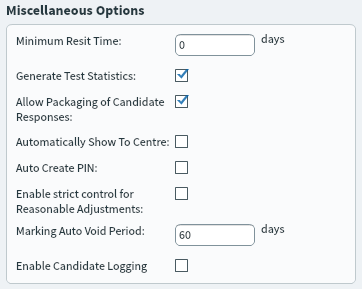
Miscellaneous Options
| Setting | Description |
|---|---|
| Minimum Resit Time |
Determines the amount of time that must pass before candidates can resit a test.
NOTE: This only applies to tests sat in the same calendar year.
|
| Generate Test Statistics |
Legacy setting. Do not use. |
| Allow Packaging of Candidate Responses |
Enables candidates’ scripts to be downloaded as a ZIP file in the Moderate, Results, and Audit screens.
TIP: You might want to use this functionality to allow tutors or clerical staff without Surpass credentials to review candidates’ scripts.
|
| Automatically Show To Centre |
Allows all candidate scripts associated with the test to be available for Centre users to view. |
| Auto Create PIN |
Determines whether a six character PIN is generated for the test. Candidates can use this PIN to unlock their tests if Requires Invigilation is selected. If Requires Invigilation is selected and Auto Create PIN is cleared, invigilators must manually unlock candidates’ tests. |
| Enable strict control for Reasonable Adjustments |
Allows users in the Schedule and Invigilate screens to only award extra time to candidates with reasonable adjustments.
NOTE: This only affects users with the Add extra time to tests with strict control for reasonable adjustments permission.
|
| Marking Auto Void Period |
Determines the period of time after which unmarked tests will be voided. By default, the Marking Auto Void Period value is 60 days. You can set this to a maximum of 9999 days. |
| Enable Candidate Logging |
Enables a secure log of candidates’ interactions in the test. This log can only be viewed in the database.
WARNING: Candidate logs can take up space in the database and this may result in charges for extra storage.
|
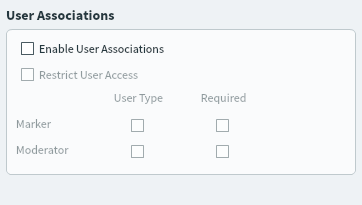
User Associations
You can set up your test to require specific users to be markers and/or moderators at the point of scheduling.
| Setting | Description |
|---|---|
| Enable User Associations |
Determines whether user associations are enabled for this test. |
| User Type |
Select Marker to allow a specific user to be assigned as the marker at the point of scheduling. Select Moderator to allow a specific user to be assigned as the moderator at the point of scheduling. If Restrict User Access is selected, only the assigned users will be able to mark/moderate candidate scripts.
NOTE: If Restrict User Access is cleared, the allocation of users serves only as a guide and anyone can mark/moderate candidate scripts.
|
| Required |
Determines whether the allocation of users is mandatory at the point of scheduling. If cleared, you can schedule a test without allocating a marker or moderator. |
Further reading
For more information about tests and test forms, read the following articles: